BASIC MICROSOFT ACCESS 2000 INSTRUCTIONS
Access is Microsoft's database program.
A. TABLES
I. INSERTING A NEW FIELD:
1) Double-click on the “Addresses” table in your database file.
2) Click on the Design button
![]()
3) Click on the gray button over on the left hand edge of the row where you wish to insert a new field. (The existing row will be moved down to make way for the new row.)
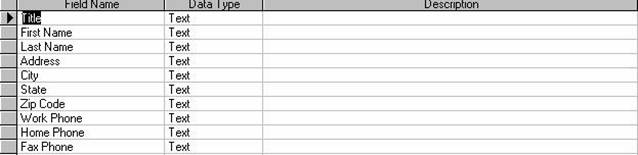
4) Click on Insert, then on Row.
5) Click into the Field Name box of the newly-created row and type in the new field name (such as “Cellphone”).
6) Click into the Data Type box right next to the above Field Name box.
7) Click on the Downward Pointing Arrow in the “Data Type” column and then select “Text” on the menu pad that drops down.
8) Close this window by clicking on the X button at the upper right-hand corner of the screen.
9) At the prompt to save this new layout (i.e., the new changes you have just made), click on “Yes”.
10) Save the table by clicking on the Save button (the button on the Button Bar above that looks like a floppy disk < ).
B. QUERIES
I. CREATING A QUERY TO FIND RECORDS:
1) Click on the “Query” tab in the Database window. Click on the New button to create a new query.
2) Click on “Design View.” Click on the OK button.
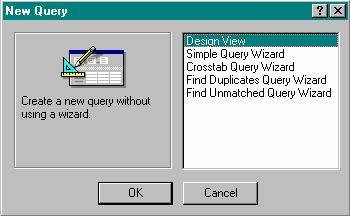
3) Click on the table you want to add to the Design View window, i.e., “Addresses”.
4) Click on the Add button. Click on the Close button.
5) Click on the topmost field name, i.e., “Title.” Scroll down to the bottom of the list.
6) Hold down the Shift key on the keyboard and click on the bottom field name, i.e., “Notes.”
7) Click and drag any field to the first column in the Design View below (into the box next to “Field:”). The rest of the fields should follow.
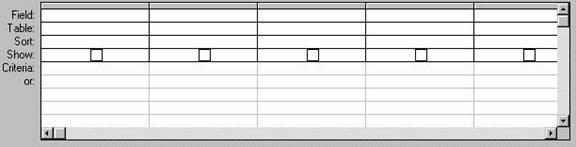
8) Click in the City field column in the same line as Criteria:, and type, e.g., “San Diego” (without the quote marks).
9) Click on the X button to close the query design view window.
10) Click on Yes at the prompt, “Do you want to save changes to the design of the query “Query1”?
11) Type in a name for the query, such as San Diego Clients, then click on OK.
II. TO RUN THE QUERY:
1) Click on the Query tab in the Database window.
2) Double-click on the San Diego Clients query to run the query.
3) You should then see a list of everyone who lives in San Diego.
III. MOVING SELECTED RECORDS INTO ANOTHER TABLE:
1) Repeat steps 1 through 11 above (in Section I) to create a new column called, for example, “Doctor.” Click on Yes/No instead of Text in the Data Type column.
2) Click into every box in the “Doctor” column that is on the same line as a record (doctor) that you want to move into the new table.
3) Click on the “Query” tab. Click on the New button. Click on “Design View” then click on OK.
4) Click on the “Addresses” table.
5) Click on the top-most field (“Doctor”). Scroll down to the bottom of the field list.
6) Click on the bottom-most field (“Notes”) while holding down the Shift key.
7) Click and drag one of the fields to the first column on the left (to the box that is next to “Field:”).
8) Click in the “Doctor” column on the line that reads “Criteria” and type “Yes”.
9) Click on Query at the top of the screen, then on Make Table Query.
10) When the computer asks you where you wish to place the newly-created table, click on “Current Database”.
11) When the computer asks you to confirm whether you wish to create a New Table, click on the Yes button. Type in a new name for the table, such as “Doctors Only” table.
12) Click on the ! button to run the query. Click on Yes.
13) Open the new table by clicking on the “Tables” tab in the Database window and then double-clicking on the icon for the “Doctors Only” table. Check to see whether all the doctors in your “Addresses” table have been imported into this table.
C. REPORTS
I. CREATING A REPORT CONTAINING ALL OF THE NAMES IN YOUR ADDRESS TABLE:
1) Click on the Report tab in the Database window.
2) Click on the New button.
3) Click on the Downward-Pointing Arrow next to: “Choose the table or query where the object’s data comes from:” and select the table you want (e.g., “Addresses”).
4) Click on “Report Wizard”. Click on OK.
5) Select the fields you wish to have in your report under “Available Fields” and click on the > button (or click on the > > button to select all of the fields).
6) Click on the Next button.
7) At the next prompt: “Do you want to add any grouping levels?”, click on the field name on which you would like to group the names (e.g., “City” or ”State”) [Normally you would leave this blank.] Click on Next.
8) For the Sort Order, click on the Downward-Pointing Arrow next to the box at the top and select “Last Name”. For the second box down, select “First Name”.
9) Click on the Next button. For the Layout, you would normally select “Tabular” for a table-like report. For “Orientation,” you would normally select “Landscape” to print your report out horizontally on the page in order to fit more fields on the sheet of paper. You can click into the box next to: “Adjust the field width so all fields fit on a page” to force the computer to fit all the fields on the page. Click on Next.
10) At the next screen “What style would you like?”, click on the style you want for the report (“Corporate,” “Casual,” or “Formal” are good choices.) Click on Next.
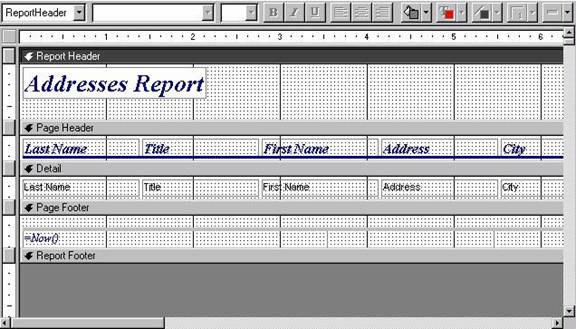
11) At the next screen “What title do you want for your report?,” type in “Address Report” or whatever you wish.
12) Click on the Finish button. [If you so desire, click on the blue “W” button on the Button Bar to export your Report into Microsoft Word. This allows you to more fully customize and modify your Report.]
13) Click on Close. At the Design Screen which pops up, you can click on certain fields or titles and change the font, size, and/or color, etc. of the text, or add or delete fields, etc.
II. CUSTOMIZING YOUR REPORT:
a) Making all the field boxes in a Report the same height:
1) Click on the Reports tab, then on the Design
button ![]() .
.
2) Move the mouse pointer to the vertical ruler alongside the left edge of the Report Design window. The mouse pointer will change to a short horizontal black arrow (® ). Click and drag this arrow along the vertical ruler to highlight all the field boxes on one row.
3) Click on Format, then on Size, then on “To Shortest” if the vertical dimension of one or more boxes is too great -or- “To Tallest” if one or more boxes is too short.
b) To align the field boxes in a Report:
1) Click and drag on the vertical ruler with the short horizontal black arrow (® ) to highlight all of the field boxes in one row.
2) Click on Format, then on Align, then on “To Bottom.”
c) To prevent a field box from moving up or down when dragging it sideways:
1) Hold down the Shift key on the keyboard.
2) Click directly on the frame of the field box with the point of the mouse pointer and drag the field box sideways. The box should slide horizontally on the page without drifting up or down. Let go of the Shift key when you have finished moving the field box.
3) You can also move more than one box horizontally by clicking and dragging on the vertical ruler to highlight all of the field boxes in that row. Then click on the frame of one of the boxes while holding down the Shift key and drag all of the boxes together.
[4) A field box can also be moved vertically without any horizontal drifting by holding down the Shift key and clicking and dragging the frame of the field box up or down.]
d) To change the font size, font type, and/or text color of the titles or fields:
1) Click on the title or field name to highlight it. (You should see a frame around it.)
2) Click on the Downward-Pointing Arrow next to the font (e.g., “Times New Roman”) and select another font. Click on the Downward-Pointing Arrow next to the font size and select another font size [12 point is normal size]. To change the text color, click on Format, then on Font, then click on the Downward-Pointing Arrow next to the black band of color and select a different color.
3) You can also hold down the Shift key on the keyboard and select multiple text areas or fields before making the above changes. (To remove the highlighting on one or more boxes, click elsewhere on the screen.)
D. MAILING LABELS
1) Click on the Reports tab. Click on the New button.
2) Click on “Label Wizard”, then click on the Downward-Pointing Arrow next to the “Choose the table or query where the object’s data comes from:” and click on “Addresses.”
3) Click on OK.
4) Scroll down and click on “Avery Number 5260” or whatever labels you are using. [Avery Number 5260 labels are a popular label format.]
5) Click on Next.
6) Select the Font Name (default: Arial); Font Weight (default: Light); Font Size (default: 8), and Text Color (default: Black). [Click on the button with the three dots ... on it to change the color.]
7) Click on Next. You will now create a sample label layout.
8) Click on “First Name,” then on the > button, then press the Spacebar.
9) Click on “Last Name,” then on the > button.
10) Press Enter.
11) Click on “Address,” then on the > button. Press Enter.
12) Click on “City,” then on the > button.
13) Type a comma ( , ), then press the Spacebar.
14) Click on “State,” then on the > button. Press the Spacebar.
15) Click on “Zip,” then on the > button. Click on OK.
16) Click on Next.
17) Type a name for your labels file, such as “Address Labels”.
18) Click on the Finish button.
19) Click on Print Preview to view all the labels and/or click on Print to print the labels out.
20) Click on Close.
21) You will then see the design view of your label in which you can change the font, style, size, and placement of the text. (Select all lines by holding down the Control key and pressing A. Then change the font, size, style (bold, italics, etc.), color of the text, and so on.)
22) Click on the Save button to save the changes you have made.
E. FORMS
Note: You can also enter data directly into the Table itself, but it is usually easier to use a form.
I. Using Autoform to automatically create a new form:
1) Click on the Forms tab.
2) Click on New.
3) Click on the Downward-Pointing Arrow next to: “Choose the table or query where the object’s data comes from:” and click on “Addresses.”
4) Click on “Form Wizard.”
5) Click on OK.
6) Click on the fields under “Available Fields” that you wish to have on your Form and then click on the > button (or click on the > > button to select all of the fields [preferred choice]). The fields you select will appear in the right hand column. Click on Next.
7) At the next screen “What layout would you like for your form?”, click on “Columnar” (the fields will be listed in a column) [preferred choice] or “Tabular” (table form). Click on Next.
8) Select the style of form you want: “Standard” [preferred] or another style.
9) Click on the Next button.
10) At the next screen: “What title do you want for your form?,” type in “Addresses” or whatever you wish.
11) Click on the Finish button.
12) You can now begin entering data into your form. Use the Tab key on the keyboard to move from field to field (or Shift-Tab to move back to the previous field).
13) Click on the Design button
![]() if you wish to change your form
in any way. [See the instructions for changing your Report Design above
for some tips on changing your Form. The same tips work for both Reports and
Forms.]
if you wish to change your form
in any way. [See the instructions for changing your Report Design above
for some tips on changing your Form. The same tips work for both Reports and
Forms.]